That is because the initial upfront cost to design and machine the mould remunerates over more parts. At Protolabs, for example, up to 25,000 parts or more can be moulded from the same tool.
However, maybe your moulding project calls for only a handful of parts. No worries. Protolabs builds cost-effective moulds for production quantities as low as 25 pieces, often within a few days of ordering.
In addition to per-unit costs, consider the material. Many plastics overlap in strength and functionality, but some are inherently easier to mould, driving down part costs. You can experiment with different materials in the interactive quote you receive when you upload your design to Protolabs.
Here are 11 injection moulding design considerations to stretch your manufacturing dollar:
1. Eliminate undercuts
2. Get rid of unnecessary features
3. Use a core cavity approach
4. Reduce cosmetic finishes and appearances
5. Design self-mating parts
6. Modify and reuse moulds
7. Pay attention to DFM analysis
8. Use a multi-cavity or family mould
9. Choose low-volume production option
10. Consider part size
11. Use over moulding
Undercuts
Undercut features complicate and, in some cases, prevent part ejection. Get rid of them if you can, but maybe that’s not possible, if, for example, you need a side action, sliding shutoff or pick out. One alternative may be using sliding shutoffs and pass-through cores, or by changing the parting line and draft angles to provide an easier mould build. These reduce tooling costs as you avoid additional pieces to the mould that add to manufacturing costs. In addition to the rise in manufacturing costs of using hand-loaded inserts, this also may have an impact on your piece part price because of longer cycle times and manual mould operation.
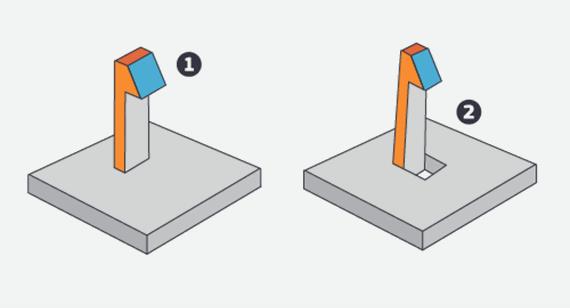
Undercuts, such as those shown, can complicate and, in some cases, prevent part ejection, so eliminate them if possible.
Unnecessary Features
Textured surfaces, moulded part numbers, and company logos look good, but be prepared to pay a bit extra for these and other non-mission critical features. That said, permanent part numbers are a requirement for many aerospace and military applications. Use a mill-friendly font such as Century Gothic Bold, Arial, or Verdana (san-serif fonts), keep it above 20 pt., and don’t go much deeper than 0.010 to 0.015 inch. Also, be prepared to increase draft if part ejection is a concern.
Core Cavity
If you need an electronics housing or similar box-shaped part, you can either sink the wall cavities deep into the mould base, requiring long thin tools to machine ribs into the mould, or machine the aluminium material down around the core and mould the part around it. The latter approach is known as a core cavity, and is a far more cost-effective method of moulding tall walls and ribbed surfaces. Better yet, this makes it easier to provide smooth surface finishes, adequate venting, improved ejection, and can eliminate the need for super-steep draft angles.
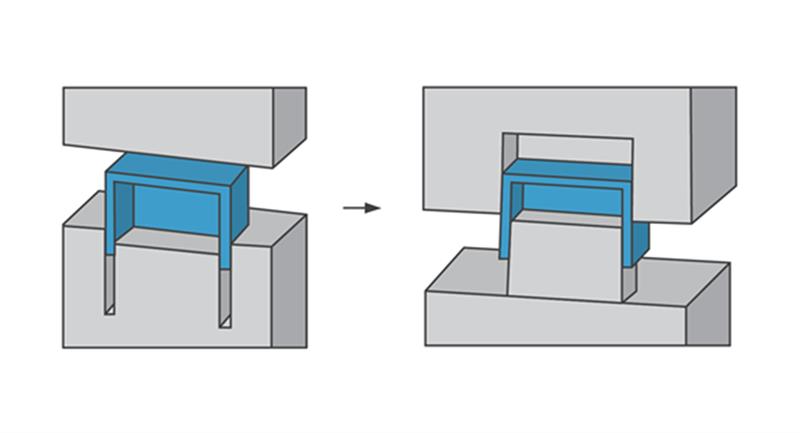
Using a core cavity, as shown, can be a cost-effective method of moulding tall walls and ribbed surfaces.
Cosmetics
Pretty parts are nice, but they often require bead blasting, EDM, or high mould polish to achieve an elevated level of cosmetic appearance. This drives up tooling costs. Anything greater than a PM-F0 (as machined) finish requires some level of hand work, up to an SPI-A2 mirror finish using Grade #2 diamond buff. Avoid fine finishes such as these unless they’re required for the job. One thing to consider regarding cosmetics is to let Protolabs know if you need the entire half of the mould polished or maybe just one small area. You could save costs by only polishing the area needed versus the entire side of a mould. When requesting a custom finish, just send Protolabs a color-coded image of the critical areas and desired finish level for each area.
Self-Mating Parts
Maybe you’re designing a snap-together case for some medical components, or two interlocking halves of a portable radio. Why build two mating parts when you can make one? Redesign the snaps so that the halves can be fit together from either direction, thus building a so-called “universal” part. Only one mould is needed, saving production expenses up front. And you can now mould twice as many of one part, instead of half the quantities of two.
This is an example of one half of a self-mating part, which fits together in either direction with its other half, building a “universal” part.
Mould Mods
It is relatively easy to remove metal from an existing metal mould. Adding metal, on the other hand, can be difficult or, for all practical purposes, impossible with rapid injection moulding. To look at this from the part perspective, you can add plastic, but you can’t take it away. Designing with this in mind is called “metal safe.”
Some injection-moulded parts go through multiple iterations until a final, workable design emerges. Instead of purchasing a new mould for every revision, a little clever planning will allow the same mould to be used multiple times. Starting with the smallest, most basic part design, mould as many pieces as needed, then re-machine the mould to include additional part features, or a larger, taller version of the same part, and mould again. This is not an exact science, but given the right part, this re-use approach can save dollars on tooling development.
Mould-ability-DFM Analysis
Every quote for an injection-moulded part at Protolabs is accompanied by a free design for manufacturability (DFM) analysis. This identifies potential problem areas, or opportunities for design improvement. Insufficient draft angles, “un-machinable” features, impossible geometries—these are just a few examples in which part designs can and should be improved before clicking the “accept” button. Be sure to review these suggestions thoroughly, and contact an applications engineer at Protolabs with any design-related questions.
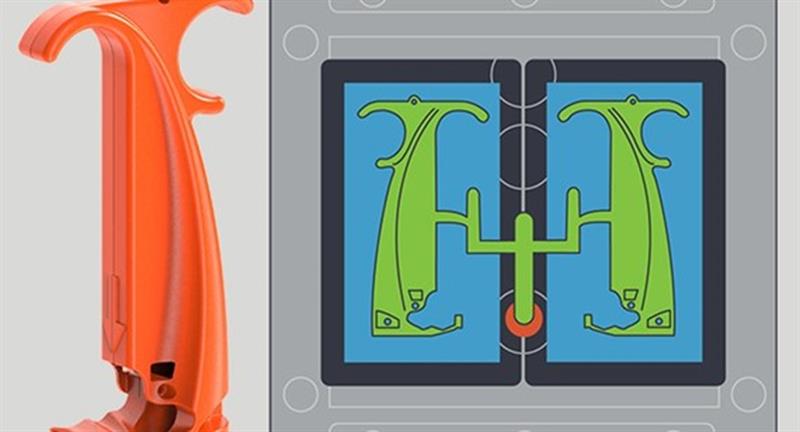
Multi-Cavity and Family Moulds
Maybe you are after a higher volume of parts? You can still achieve high volumes using aluminium tooling with two-, four-, or eight-cavity moulds depending on size and part geometry that can reduce your piece part price, although this would impact your tooling costs.
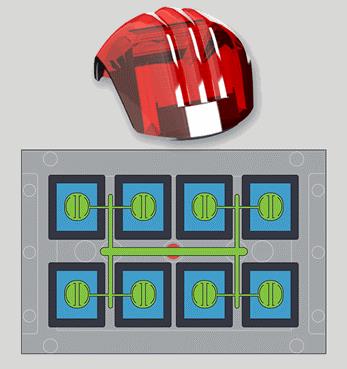
This eight-cavity mould is used for a higher volume of parts (finished part is pictured above the mould illustration).
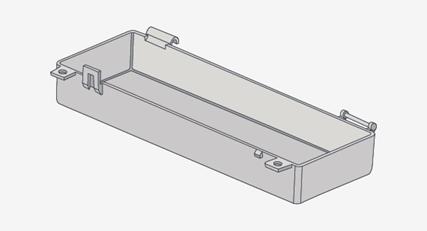
Got a family of parts that all fit together? How about multiple moulding projects at one time? There’s no reason to build a mould for each individual part, provided A) everything is made of the same plastic, B) each part is roughly the same size (e.g., have similar processing times), and C) can all be squeezed into the same cavity, while still allowing for proper mould functioning.
Here is an example of a family mould, used to produce the part pictured, which was a component of the SubQ It, a medical tool used to close surgical incisions with bio-absorbable fasteners.
In addition, maybe you can join some of those parts with a living hinge? This method is a great way, for example, to mould two halves of a clamshell-style container. These parts would otherwise need a pin-type assembly to open and close. The only caveat here is that a flexible and tough material must be used, such as polypropylene (PP).
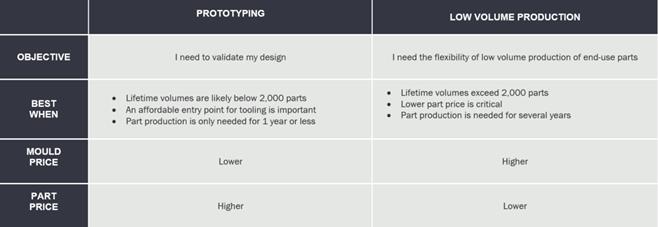
Low Volume Manufacturing
Still another way to reduce moulding costs, depending on your part volumes, is to consider low volume manufacturing. At Protolabs, two injection moulding service options are available (see table below). One is best suited for those who need smaller part quantities, usually associated with prototyping. The other option is a good fit for those who require slightly larger part quantities, typically up to 10,000-plus parts from aluminium moulds. Low volume production can be a great option to manage demand volatility of your parts, reduce total cost of ownership, and leverage cost-efficient bridge tooling.
Part Size
Always consider part extents. In moulding-speak, that means how big is the part, and will it fit comfortably in the mould while allowing for sprues, runners, ejector pins, and all the other considerations needed to make a mould work. Protolabs’ maximum part size for injection moulding is currently 480mm by 751mm with a maximum depth from the parting line of 101mm deep. However, larger parts like these, in turn, require a larger mould. This may have an impact on your mould and part costs.
Overmoulding
Finally, consider an overmoulding option. Depending on the part, it might cost you more upfront, but could potentially save you money later. For example, overmoulding a gasket on a part upfront might be an added cost, but it can save costs later from having someone install a gasket manually.
As always, feel free to contact an applications engineer with any questions, at applicationengineers@protolabs.co.uk or contact our customer service department at customerservice@protolabs.co.uk