It also helps avoid long-term risk and delivers the most optimised part design possible. And no matter how skilled the engineer or powerful the design software they use, that means prototyping. For example, medical device manufacturers must assess the ergonomics and functionality of a surgical instrument before offering it to physicians. Commercial drone designers might make dozens of test flights in wind tunnels to determine their craft’s airworthiness, robot builders want to see how efficiently their latest droid design performs its assigned tasks, and smart automakers perform numerous form, fit, and function checks on countless components with every new model. Each of these activities requires a prototype (or more likely, multiple prototypes).
This is especially true for plastic parts, where demand for the winning design hopefully skyrockets and requires subsequent investment in high-volume production tooling, aka plastic injection moulds. What better way to avoid a costly design mistake than to prototype until it is perfected? On the flip side, manufacturers from all industries often evaluate their newest metal brainchildren by first 3D printing, machining, or moulding plastic versions of them. Again, it’s about reaching the finish line in the most effective manner.
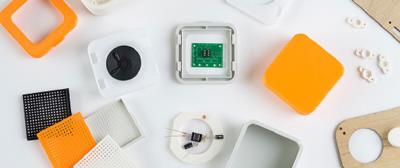
Within the product development process, plastic prototypes have different use cases:
Concept Model: This is likely one of the first parts produced during a product cycle. It is intended to provide a visual representation of the part or product. Aspects such as material strength and surface finish quality are less of a concern during this phase. 3D printing technologies such as stereolithography and fused deposition modelling are typical manufacturing methods for a concept model.
Functional Prototype: A functional prototype gives a design team the ability to test form and fit of a part. During this phase, having an accurate representation of the final part's material properties can be especially valuable, so technologies like CNC machining or 3D printing technologies like selective laser sintering or Multi Jet Fusion are often used.
What are the Manufacturing Options for Plastic Prototyping
Fortunately, there are several options available for prototyping plastic parts. Each provides its own distinct advantages (and limitations) that might determine which is most suitable for your application.
3D Printing: Can likely be the most cost-effective method for a plastic prototype. 3D printing also offers quick-turn lead times and fewer design constraints.
CNC Machining: Parts can be manufactured as fast as 3D printing, but machining also provides the same material options that will likely be used in a final, production part. The downside of CNC machining when compared to 3D printing is less design freedom and at times be more costly.
Part size, surface finish quality and feature size/resolution requirements should also be considered when choosing a service for prototyping.
Whatever manufacturing technology you choose for a plastic prototype, ensuring that your part is manufacturable via the intended production method is crucial. In other words, don’t paint yourself into a corner by 3D printing prototypes, only to discover when quantities ramp up that the parts can’t be injection moulded.
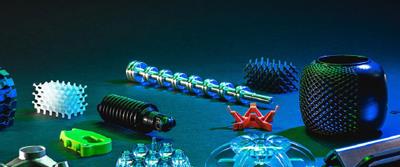
3D Printing for Plastic Prototyping
Let’s start the discussion with a brief overview of the technology that quite literally launched the rapid prototyping industry more than three decades ago: 3D printing. In those early days, the only option was stereolithography (SLA). Today, however, manufacturers can choose from a range of technologies, including selective laser sintering (SLS), jetting processes like PolyJet and Multi Jet Fusion (MJF).
We’ve published numerous design tips covering these technologies, so refer to those for the technical details behind accuracy, raw material selection, and surface finish capabilities. Suffice it to say that all are excellent for making prototypes; several are also fast enough and their feedstocks robust enough to support low-volume, end-use part production. Here are some additional benefits and challenges with 3D printing.
3D Printing Benefits
More cost-effective: Because there’s no fixturing or cutting tools with 3D printing, part costs are generally lower than the alternatives. It’s just the raw material, machine time, and whatever secondary post-processing is needed (more on this shortly).
Fast lead times and quick iterations: Similarly, the elimination of tooling and traditional “setups” as with injection moulding means quick turnaround times. Also, many printers have sufficient build volumes where designers can produce multiple iterations in the same build.
Fewer design constraints: The 3D printing community talks at great length about its “unlimited design freedom.” This is a slight exaggeration, but the fact remains that many manufacturers have used it to produce complex assemblies in one print, reducing part count and simplifying the supply chain. As previously mentioned, ensuring the design can be manufactured at production quantities via injection moulding is key if that is the end goal.
3D Printing Challenges
Mechanical properties: The resins and powders used in 3D printers are “like” materials. They approximate (and in some cases exceed) their moulded and machined counterparts, and even though many of these are suitable for end-use applications, they are not direct replacements.
Surface finish: Due to the layer-by-layer build process, practically all 3D printed parts suffer some level of “stair-stepping." Removing these imperfections using vapour polishing or abrasives is a popular option, but this adds time and cost to the project.
Limited colour options: As a rule, 3D printing delivers white, black, grey, or translucent parts. We're happy to dye or paint them after finishing, but this is an additional (albeit common) post-processing step.
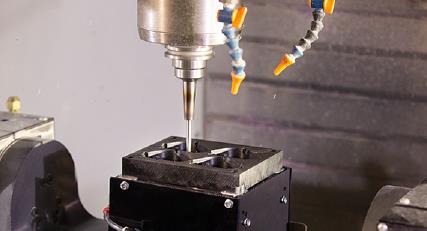
CNC Machining for Plastic Prototyping
Because Protolabs has always specialised in fast turnarounds, we've developed standardised tooling sets that allow us to deliver custom-machined parts in a day or two. The lead time is similar to 3D printing, and the price is not significantly higher (depending on the part geometry, quantity, and other factors). That said, some differences exist between machined parts and those made via 3D printing:
CNC Machining Benefits
- End-use materials: Sometimes it’s important to prototype using the actual production materials. Perhaps the parts will undergo functional testing and validation, or the customer wants to see and touch prototypes that are as close to the final design as you can provide.
- Production quantities: Generally, 3D printing becomes less cost-effective as quantities increase. This decades-old status quo is beginning to shift with newer technologies like PolyJet, but machining is almost always the winner in terms of manufacturing speed at quantities in the teens and higher, where setup costs are more easily amortised.
- Fast lead times and quick iterations: CNC machining is as fast as 3D printing, and in some cases, faster. Parts can be turned around in as fast as one business day.
CNC Machining Challenges
- Part geometry: As mentioned earlier, 3D printing is the king of complexity. Machine shops struggle with deep pockets where cutting tools can't reach, thin walls that might create chatter, extreme length-to-diameter ratios in holemaking, and other part features that are no big deal to a 3D printer.
- Multi-part assemblies: Machined parts often go into an assembly, and joining these components typically means bolting or welding them together, adding cost. If what would normally be an assembly that can be 3D printed as a single piece, the entire project will enjoy a big win. But again, just be sure you can economically produce the 3D-printed part as quantities rise.
Injection Moulding for Plastic Prototyping
The terms “plastic injection mould” and “prototyping” have long been exclusive of one another. That’s because the high-volume production tooling needed to manufacture the lion's share of plastic parts is both expensive and requires months to develop. We changed this paradigm at Protolabs with quick-turn aluminium tooling, which can mould hundreds of prototype parts and is typically delivered within a week or so.
There's no need for a lengthy list of pros and cons here, as this decision tree has but one or two branches. If you need a hundred or more injection moulded prototypes for functional testing, quick-turn tools give customers parts made of real material, really fast, and boasting tolerances and surface finishes nearly identical to those made with production tooling. Quick-turn moulds can also serve as a bridge tool until that production mould is complete, or for pilot runs to test the moulded part design.
The caveat is that it takes time. Time to design the mould, time to machine it, time for testing and final approval. It's still much faster and far less costly than the "hard tool" alternative just described, but could be prohibitively expensive in situations where 3D printing or machining will solve the immediate problem. As suggested earlier, it's a lot to think about, so give us a call or upload your part design to our digital quoting platform to evaluate the options and receive automated design for manufacturability (DFM) feedback. Happy plastic prototyping.
As always, feel free to contact an applications engineer with any questions, at applicationengineers@protolabs.co.uk or contact our customer service department at customerservice@protolabs.co.uk
